Set up columns
You can set up the columns of each list individually. This includes adding or removing columns and changing their width and position. You can also customise the result list columns using the context menu.
| When F2 is configured, it is determined which columns are included in a result list by default. F2 is configured in cooperation with cBrain. |
You can also save your column settings and apply them to other lists. Read more about setting up views in F2.
Select columns for the result list
You can select which columns to display in a given result list. Right-click on any column, and then click on Select columns in the context menu. The "Select columns" dialogue opens. The number of columns available varies depending on your installation’s modules. You can find an overview of all columns and their content on the Column descriptions page.
| The result list view - whether it is showing records, cases, documents, or requests - determines which columns can be selected. |
The figure below shows an example of the "Select columns" dialogue.
You can search for a column header by using the search field at the top of the dialogue. By default, all column headers are shown in the dialogue. Tick the box Show only selected columns to display only the columns currently included in the result list.

Click on the Deselect all button (1) to deselect all selected columns at once. Tick the checkbox by a column group header (2) to select all columns in the group. Remove the tick from the header to deselect all columns in the group. Select or deselect a column using the box next to the column header (3). The selection only applies to the current list. Save or cancel your changes with the Save and Cancel buttons at the bottom of the dialogue (4).
| If you remove all the result list’s columns by mistake, right-click on the blank column bar to access the "Select columns" dialogue. |
Move and resize columns
Move a column by dragging its header to a new position with the cursor.
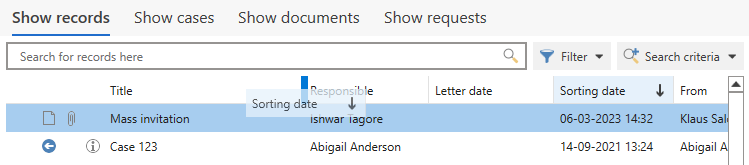
You can adjust a column’s width by dragging one of its ends with the cursor. If a column isn’t wide enough to display all its text, you can hover over the text with the cursor to view a tooltip with the full text.
| The first four columns in the result list contain icons that provide visual information about list items. cBrain recommends that you do not change the position of these four columns. |
The column context menu
The column context menu lets you customise the result list. From here, you can sort, group, and change columns.
Right-click on a column header in the result list to open a context menu with customisation options.
| You can also open the context menu using the keyboard shortcut Shift + F9 when focus is in the result list. |
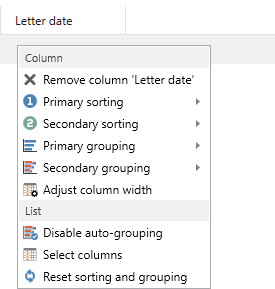
The context menu is divided into two groups. The "Column" group contains menu items specifically for the column you have right-clicked on. The "List" group contains menu items related to the entire result list. The menu items are described in the table below.
| Icon | Function | Description |
|---|---|---|
|
Remove column |
Remove the column you have right-clicked on. You can add it again at any time using the "Select columns" menu item. |
|
Primary sorting |
Use this column to sort the result list. Choose either:
You can also sort by a column by clicking its header in the result list. Subsequent clicks switch the sorting order between ascending and descending. |
|
Secondary sorting |
Use this column to sort the result list in secondary order. Choose either:
You can also select a column for secondary sorting by clicking its header in the result list while holding the Shift key. |
|
Primary grouping |
Use this column to group the result list. Choose either:
|
|
Secondary grouping |
Use this column to group the result list in secondary order. Choose either:
|
|
Adjust column width |
Adjust the width of the column you right-clicked on. Opens a dialogue in which you can set up the column width. You can also adjust a column’s width by dragging one of its ends with the cursor. If a column is too narrow to display all text, you can hover the cursor over it to view the full text in a tooltip. |
|
Enable/Disable auto-grouping |
Enable or disable auto-grouping for the current list. |
|
Select columns |
Select which columns you want to include in the result list. Opens the "Select columns" dialogue. |
|
Reset sorting and grouping |
Reset your sorting and grouping to the default sorting of the current list. |